Welcome to Bepa's Garden!
This blog is about organic gardening, healthy eating and healthy living.
Each month I will be posting Garden To-Do Lists, Tips & Techniques, Garden Project Plans, Photos from the Garden, Recipes and Book Reviews.
I hope you enjoy reading and I hope I can inspire others to start a backyard garden!
Happy Gardening!
~Rob~

Pages

Wednesday, October 31, 2012

Dabbling in Dibbles


I can remember as a kid working with my grandfather in his greenhouse planting seeds in peat pots. I would use a hand made dibble that my grandfather had carved out of a piece of scrap wood to make holes in the soil for the tiny seeds. I used that dibble for many years and it became an extremely useful tool for planting. After my grandfather had passed away, his greenhouse was sold and that dibble was lost forever.

Over the years, while working in my own greenhouse, I would often grab any handy item to use while starting seeds. I have used a pencil, stick, sharpened dowel, my finger, and the list goes on. Every time I finished planting I would say to myself that I needed to make a permanent dibble like the one my grandfather made, but never got around to doing it and the following spring I would again find myself searching for any item to poke holes in the soil.


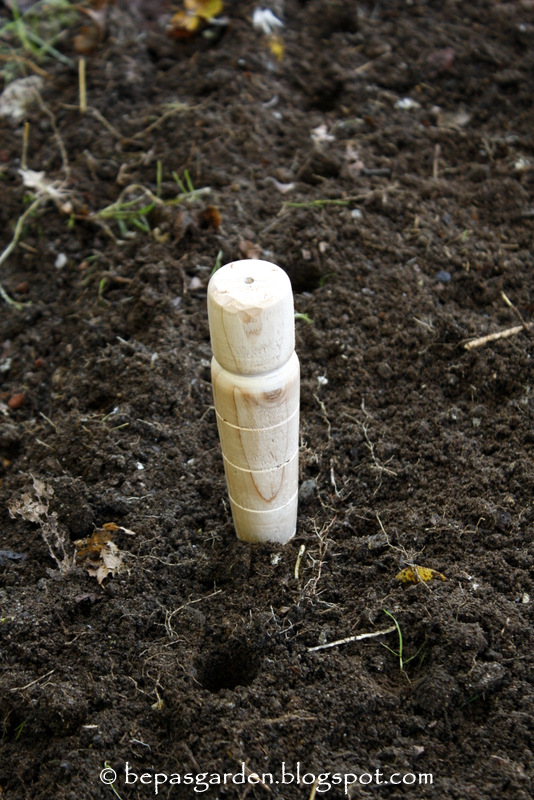
I am an architectural designer by profession and woodworker, so I finally decided to make a proper dibble for myself and started playing around with some different styles. I tried turning them out of oak and pine, and carving rounded ones out of walnut. I remembered the thick blocks of mahogany that I "rescued" from a cabinet shop many years ago that were sitting in my shop. These slabs were 2" think off-cuts left over from large job, but were headed for the trash before I saved them (I can't stand to see beautiful wood like that wasted). I was saving them to make something that would be useful and that had purpose.

I started to hand-carve some simple designs out of the mahogany blanks until I came up with one that was both economical and aesthetically pleasing.


I came up with 2 different style dibbles in 3 different sizes, each serving a particular purpose. They are each individually hand-carved and fit perfect in your hand while planting.

Pointed Body Dibbles

 The pointed body dibbles work well for planting seeds and making small furrows in the soil and comes in three sizes:

Large (1-1/2" x 1-1/2" x 8") - for planting larger seeds and all round use.
Medium (1-1/8" x 1-1/8" x 6") - for use in the greenhouse or garden for transplanting seedlings.
Small (3/4" x 3/4" x 4") - for making small holes in soil blocks or seedling trays for starting seeds.

Rounded Body Dibbles

The rounded body dibbles work well for planting bulbs and also come in three sizes:

Large (1-1/2" x 1-1/2" x 8") - for planting larger bulbs and all round use.
Medium (1-1/8" x 1-1/8" x 6") -  for transplanting seedlings and planting bulbs.
Small (3/4" x 3/4" x 4") - for planting smaller bulbs.

Each dibble is hand-carved out of solid mahogany and finished with natural beeswax to protect and nourish the wood. You can hold them by the top or by the body like a pencil for a comfortable grip.

I love old hand tools and am very pleased with the design and function of these dibbles. They are very high quality and can easily become an heirloom to be passed down from gardener to gardener. They are both functional and aesthetically pleasing. 

They are the first item in a series of gardening tools that I am designing and developing and are available for purchase through my ETSY store.

Happy Halloween!!!

Tuesday, October 30, 2012

Riding out the Storm ...


We had 80+ mile an hour wind gusts!
The ducks enjoyed the rain for a while before they were put up in the garage to ride out the storm.
The neighbors trees came crashing down.

Surprisingly enough the greenhouse didn't have any damage!
The cold frame was the only thing that was damaged, a 1/2' stick poked through the plastic!

Kale
Carrots.
All the plants survived, protected under a layer of leaves and twigs.

The ducks happy to finally be out of the garage!

Hope everyone that was in the path of the storm is safe and sound!

Monday, October 22, 2012

Planting Garlic


This past weekend it was finally time to plant the garlic in the garden. We use garlic in just about every dish we make and also use it to make pest deterrent sprays for the garden, so it is an important crop for us to plant. Garlic is fairly easy to grow if you follow some simple steps, the first being to start will healthy stock. I bought garlic from Seed Savers Exchange a couple years ago and have been saving the largest cloves for re-planting each fall. I started with several different varieties to see what grew the best in my area and to determine which flavor I liked the best. I grew:

Erik's German White - red-purple skinned cloves, east to peel. Rich and slightly spicy garlic flavor. Hardneck, 4-6 large cloves.
Chet's Italian Red - Heirloom variety from Chet Stevenson of Tonasket, Washington. A good garlic for raw eating because the flavor is not too strong. Softneck, 12-16 cloves per bulb.
Chesnok Red - Beautiful purple striped paper with red cloves, easy to peel. Good lingering taste, retains flavor well when cooked. One of the very best for baking or roasting. Hardneck, 8-10 cloves per bulb.
Georgian Crystal - Beautiful fat bulbs with large cloves, mild flavor when raw, smooth and buttery when roasted. Hardneck, 4-6 cloves per bulb.
Georgian Fire - Described as a truly "white hot" garlic. Raw taste is strong with a nice hotness that is not at all unpleasant. Great for salsa and salads. Hardneck, 4-6 cloves per bulb.

When to Plant:

Garlic should be planted between September 15 to November 30, with the optimal time being in October after the first light frost. Remember to plant the largest cloves to grow the largest bulbs. Leave the outer skin on the bulb and do not separate the cloves from the bulb until you are ready to plant.


Garlic is a heavy feeder and likes a soil with a pH of about 6.5, loose and rich with lots of organic matter to provide good drainage.

I use the biointensive method for planting, which allows you to plant 4 times the amount in one-quarter of the area. Some great resources on biointensive planting are How to Grow More Vegetables and The Sustainable Vegetable Garden by John Jeavons of Ecology Action. The biointensive method includes double digging your beds, and planting in a honeycomb pattern to make better use of your planting area.  Double digging allows the plants roots to grow larger, giving them access to more food and water, providing for healthier plants and better yields. 
According to the charts in these books, garlic should be spaced 4" apart.


4" planting layout.


Plant the cloves with the root end down, pointed end up. Cover with 2" of soil and a 6" layer of mulch. I use chopped leaves as mulch, which works the best for me. 


 I made 4' x 4' mesh baskets to put over the beds to keep squirrels and other critters from stealing my seeds.


The garlic cloves will begin to sprout through the mulch in 4-8 weeks, depending on the variety and weather conditions. Do not be concerned, the plants may suffer frost or a small freeze but will survive. 
Garlic needs about 1" of water per week during the growing season. Stop watering about June 1st, this allows the bulbs to form better and harvest more easily. Keep weeds under control early. Garlic does not compete well with weeds. 


 Cut or break off the scapes after they are 10" long as they will inhibit bulb growth if allowed to grow. The scapes can be used in soups, stir fries or even pesto.
Harvest after leaf die-back begins and there are still five green leaves remaining on the plant, sometime in June or early July, depending on your climate. Do not wait too long or the bulbs will begin to separate in the ground.


I have read that some garlic farmers will plant the bulbils ( the "seeds" that form from the flowering scapes) to grow more garlic. The bulbils are  supposed to be better to replant because they have not touched the soil and therefore do not carry any of the plant diseases that may have affected the garlic bulb. The only drawback to planting this way is it takes two years to get full garlic bulbs. The first year you will end up with a round, which you harvest and dry when harvesting your garlic, then replant in the fall as you would regular garlic cloves.  In the 2nd year you will end up with a complete clove. I like to mimic nature as much as possible when planting and this makes perfect sense to me. In nature, the garlic will grow, send up a scape, flower and then drop it's seeds in the fall. 
Each year I have saved the bulbils from the flowering scapes, but never get around to planting them. This year I planted 4 rows of bulbils along with the garlic cloves to see what kind of results I get.

Garlic planted on left - bulbils planted on right.

 And of course, I had my two helpers watching everything I did, checking the freshly turned beds for bugs and watching out the large birds flying overhead!

Shared at:


Down Home Blog Hop


Farm Life at its Best


Photobucket

Friday, October 19, 2012

Zucchini Pasta Alfredo

We have been trying to add more raw meals to our menus after reading about the many benefits of eating raw. Raw foods are supposed to be more beneficial because when food is heated over 104 degrees Fahrenheit, it begins to damage it's nutrients and enzymes. Research has shown that nutrients are damaged and destroyed as food is heated and cooked. Adding more raw dishes to our diets has made a huge difference in how we feel.


Zucchini Pasta Alfredo

This is more of a summer recipe because it is easier to get fresh zucchini from your garden, but it's equally delicious anytime. If you aren't into raw but still want the benefits of eating healthier, you can still heat the zucchini and sauce, it is delicious either way!

The "pasta" in this recipe are actually zucchini cut into noodles with a spirooli. This is a great tool that can also make potato noodles, potato twists, slice cabbage and do much more with raw vegetables. We bought ours from NaturalZing for $28.50, but you can also get them from Amazon.


Live Zucchini Pasta Alfredo


Ingredients:
2 medium zucchinis
1/2 cup raw cashews
1 lemon, juiced
2 Tbs olive oil
1 Tsp sea salt
2 cloves garlic
1/2 cup water
1 Tbs pine nuts

Directions:

- Soak cashews in water for 1 hour.
- Create noodles with the zucchini using the spirooli.
- Blend the soaked cashews, water, lemon juice, olive oil, sea salt, garlic and pine nuts in a food processor or blender until well blended and creamy.
- Place noodles on a plate and spoon sauce over the top or mix noodles & sauce together, to your liking. You may have extra sauce.
- Garnish with fresh basil.

To make the zucchini noodles:

Cut ends off zucchini
Put in spirooli noodle maker

Turn handle and apply constant pressure towards blade

Add this is what you end up with!

Add the cashew sauce, garnish with basil and serve!
Shared at:


The Chicken Chick


”Wilderness\Wife”